


Small Note before we start:
This blog is the beginning of a series of blogs that I will be writing as I continue to upskill in DevOps. I am excited to share my journey with you and hope you find these posts informative and helpful.
In this post, I will discuss the basics of Docker and its importance in DevOps. Docker is a tool designed to make it easier to create, deploy, and run applications by using containers. In this post, I will explore the reasons why Docker is so important in the world of DevOps and how it has revolutionized the way we develop and deploy software.
Firstly, I will discuss the basics of Docker, including what it is, how it works, and the benefits of using it. Then, I will explore the various use cases where Docker is commonly used and the advantages it offers over traditional methods of software deployment. Finally, I will dive into the details of how Docker works and provide some examples to help illustrate its capabilities.
By the end of this post, you should have a good understanding of the basics of Docker and its importance in DevOps.
Why use Docker?
Imagine you are installing software. what do you usually do? Download and run the installer, Encounter an error (if you're not lucky..xD) and try troubleshooting it and finally fix it, and then re-run the installer hoping you wouldn't run into any other errors, and troubleshoot again if you run into another one and this goes on till you get lucky and you finally fix all the issues and resolve all the dependencies that the piece of software you're trying to install has.

This is exactly what docker is trying to fix, goal of docker is to make things easy for you to install and run things (software) on your devices (not particularly your computer, any computer ranging from your personal laptops to web servers/cloud-based computing platforms) without worrying about setup or dependencies.
What is Docker?
Docker is a platform that revolves around creating and running containers. It is primarily used to build, test and deploy applications quickly in an isolated environment (Containers).
Introducing a few terms before we dive in:
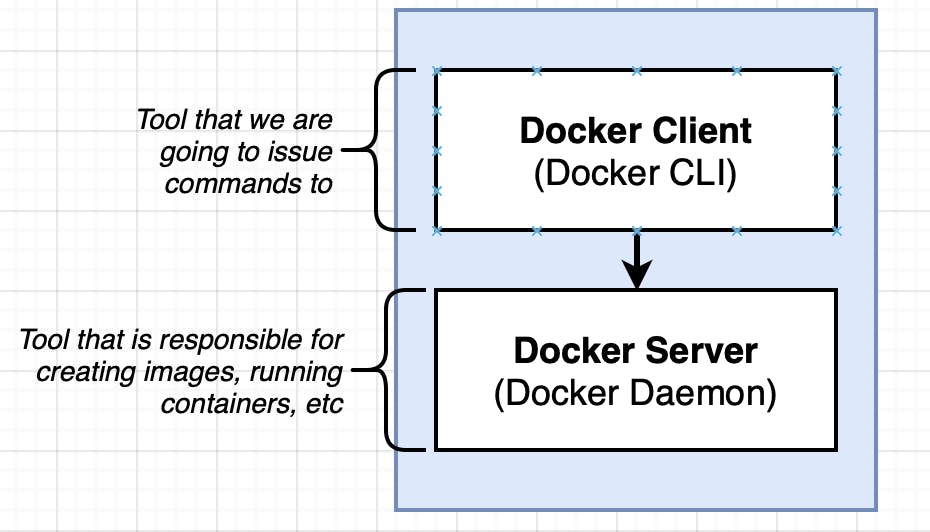
What is Docker Client?
A Docker client is a command line tool that allows users to interact with the Docker daemon (Docker server), which is responsible for managing Docker images and containers. With a Docker client, we can build, run, and manage Docker containers on our local machines or on a remote server. The Docker client communicates with the Docker daemon using the Docker API, which allows us to perform a wide range of operations, from creating and managing containers to inspecting images and networks.
What is Docker Server?
A Docker server, also known as the Docker daemon, is responsible for managing Docker images and containers. It runs in the background, listening for Docker API requests and managing Docker resources. The Docker daemon can run on a local machine or on a remote server, and it can manage multiple containers and images simultaneously. The Docker client communicates with the Docker daemon to perform operations such as building and running containers.
What are Containers?
Before explaining what really are containers, it would be helpful if we start with why are they used in the first place and what is it doing in the background.
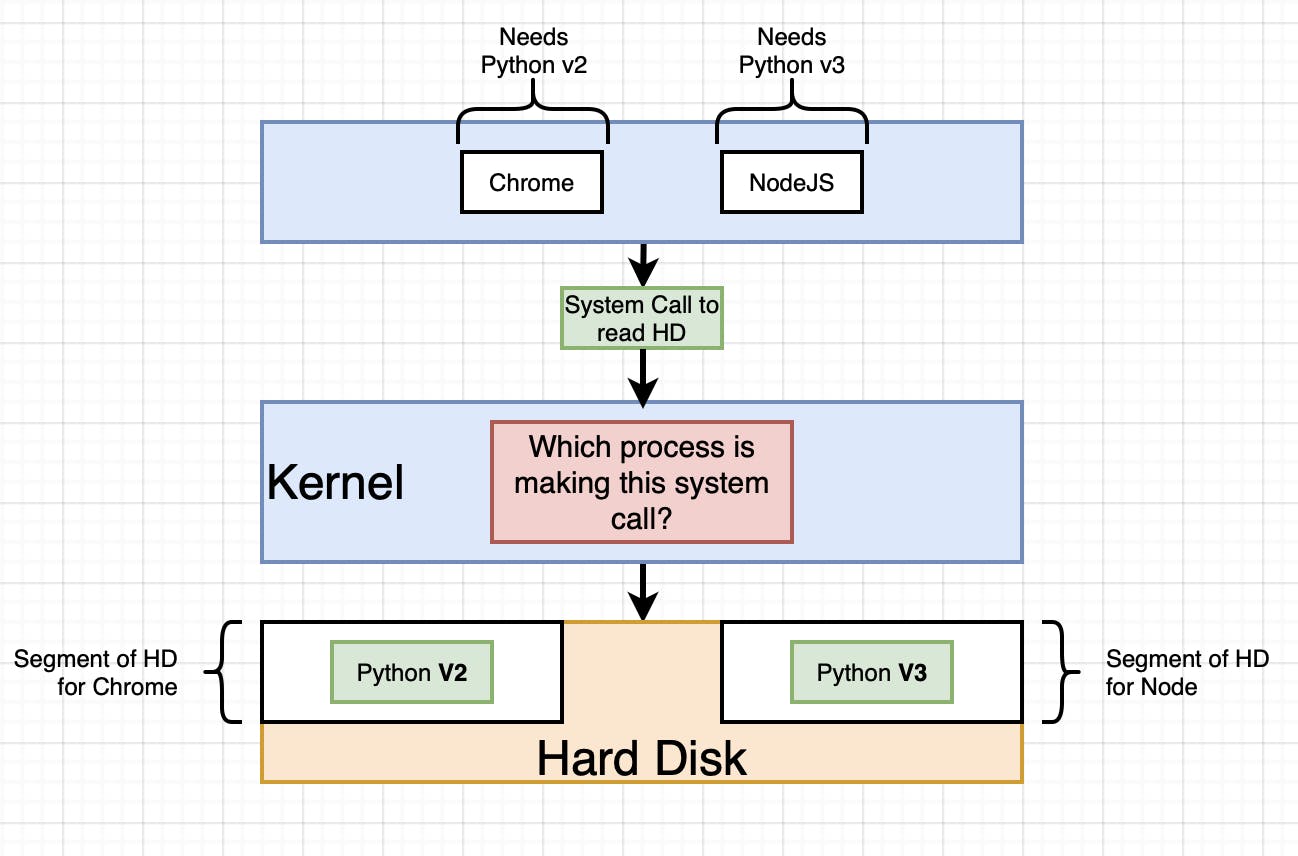
Let's say hypothetically, that we need Python V2 to run Chrome, and need Python V3 to run NodeJs. (Just mentioning again that this is purely hypothetical and just for an example we do not actually need Python versions to run Chrome or nodeJs.) and our hard drive only has Python V2. This normally means that we will only be able to run Chrome in our system and not NodeJs. How do we handle this situation? This can be handled in multiple ways:
Can start using a Python version manager to run to different versions of Python at the same time.
Can run both these software in two different Virtual Machines where respective Python versions are downloaded and installed
Can use an operating system feature called Namespacing (read more about this here) to run this within the same system

The 3 one on the list sounds more convenient to me, however, I will go over the difference between using virtualization and using namespacing in some time, please continue reading...
Elaborating on 3 above:
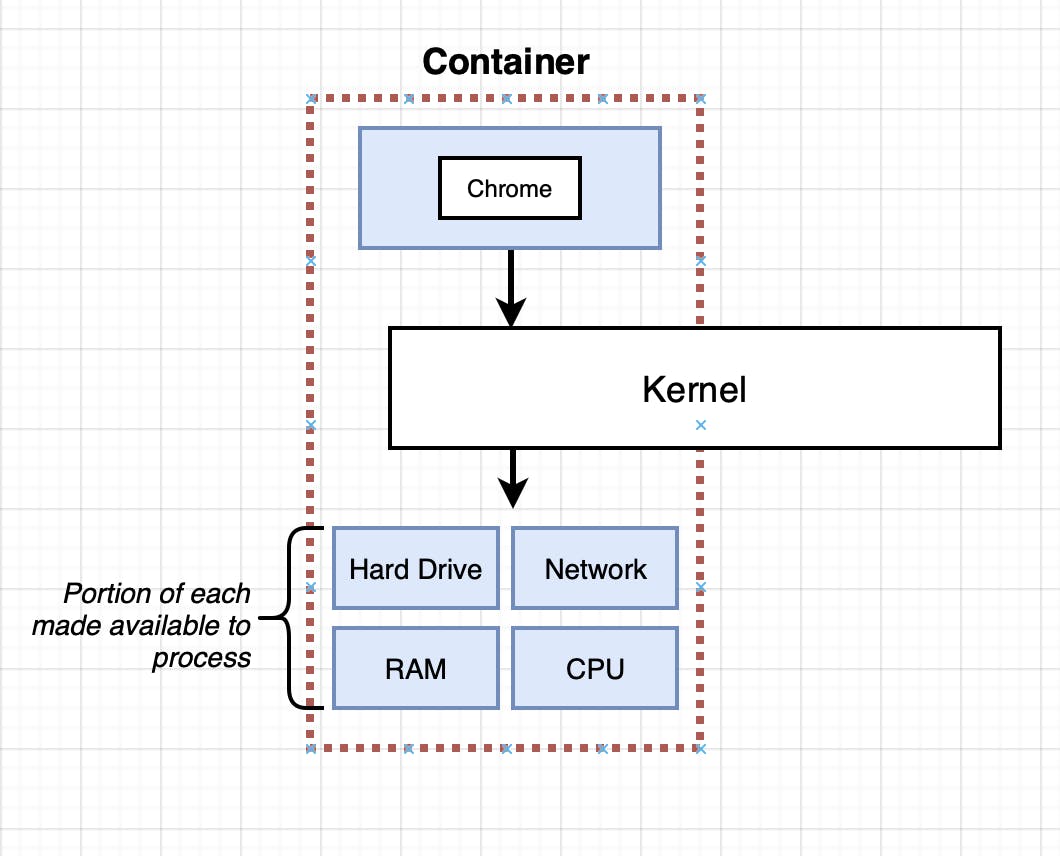
It revolves around, dividing the Hard drive into segments that are completely isolated having the two different Python versions as mentioned above. So now when the processes are trying to read from the hard drive the kernel tries to understand which process is making the system call and routes the request to the appropriate segment.
So the vertical, that is surrounded by the dotted line is what is actually referred to as a container. It is really a process or a group of processes that have a group of resources specifically assigned for themselves (This is why most people confuse containerization and virtualization).
What is an Image and how does a single image file create a container?
When we are looking at an image, it is just a file system snapshot. To put it in simple terms, it is just like copying and pasting a set of files that are required from a project directory when the project is working as expected and preserving them.

Now we can see that the image contains only Chrome and Python with a startup command. This is what happens behind the scenes when we take an image and turn it into a container. First, the kernel is going to isolate a little section of the hard drive and make it available to the specific container and now when the container is started the file snapshot is picked from the container and placed into that segment of the hard drive.

Basic Docker CLI Commands:
1. Run a docker Container with an Image:
docker run <image-name>

#this starts up container with hello-world image
docker run hello-world
Output
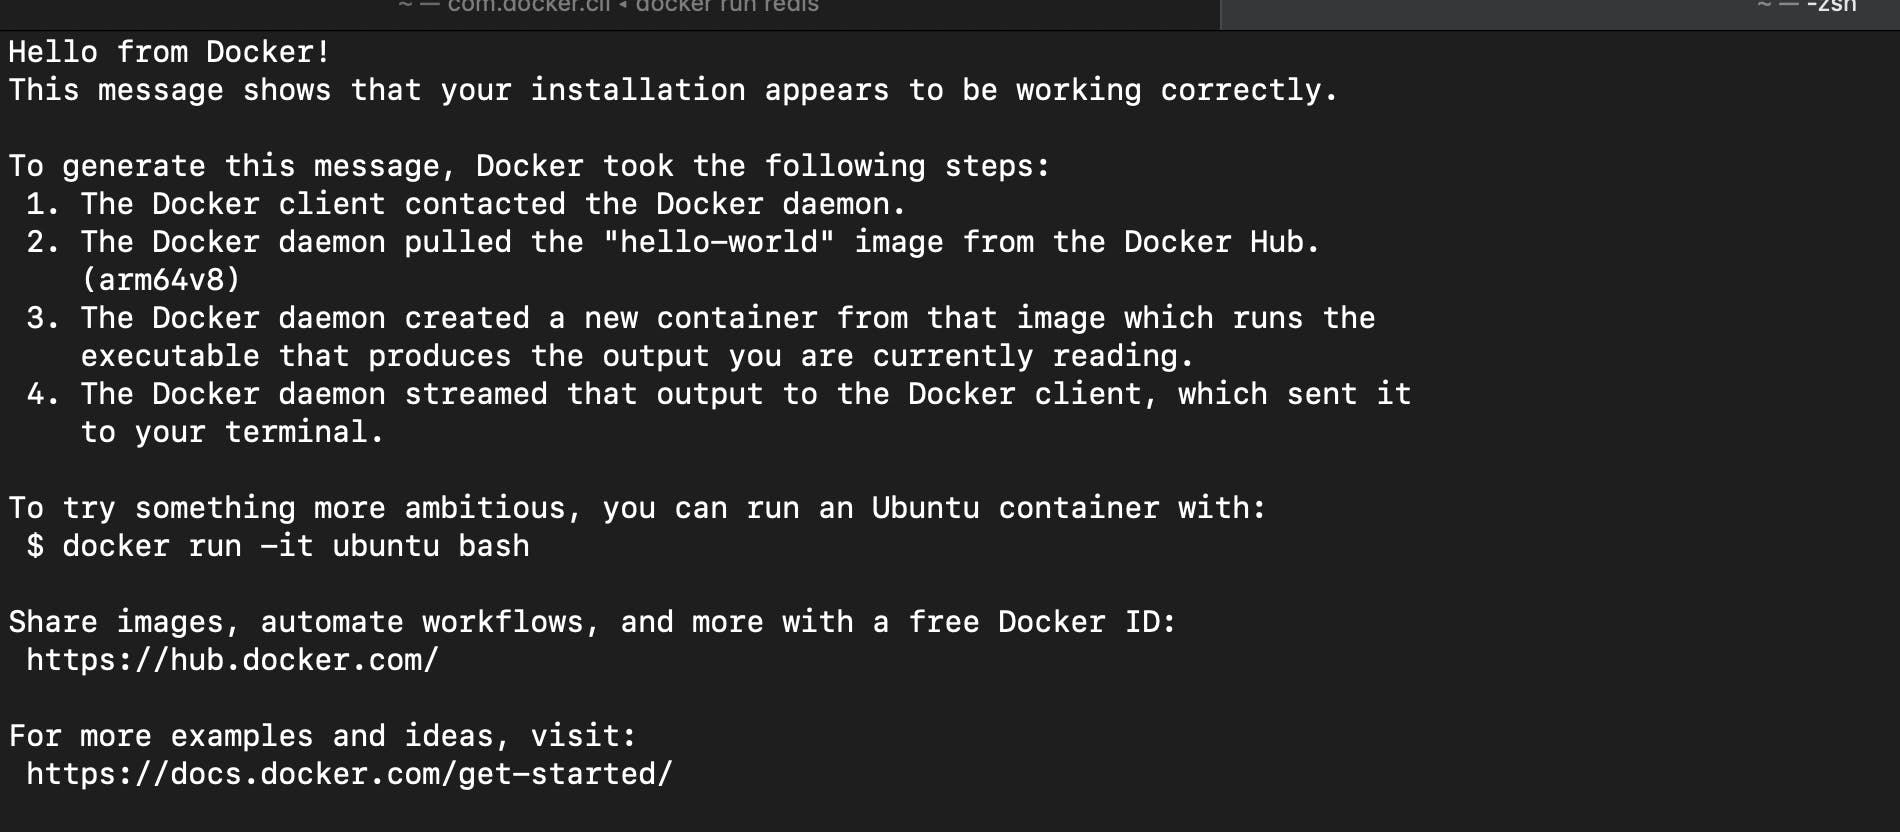
hello-world is a basic image used just to test the installation of docker. However, it will be very helpful for us to understand what is happening behind the scenes when you are trying to perform docker run <image-name> .
The Docker client contacted the Docker daemon (Docker server) to see if the image is present in the local image cache.
If the Image is not available in the local image cache, then the docker daemon will pull the
hello-worldimage from the docker hub.Then the docker server will create a new container from the image that is pulled in from the docker hub which will run the executable that produced the output which is streamed by the docker server to the docker client.

Note:
The docker run command is the same as running two other commands together, if you remember from above I've mentioned that a container is created from an image.
# this created and started a container
docker run <image-name>

# this is the same as
docker create <image-name> #we get the container-id as output here.
docker start <container-id>
So from here what do you think is the difference between creating a container and starting a container? (Remember the parts of the image)
That would be a good question to ask:docker create <image-name> command places the file system snapshot into the container segment's hard drive - step-1 of creating a container from an image.
docker start -a <container-id> command phase is when the startup command that is part of the image is executed inside the container. ( -a flag here just means attach. This basically prints the output of the startup command in the container to the docker client output )
2. List all the Containers that are running now:
docker ps
This will list all the containers that are running currently in your system.
if you want to see the containers that ran in the past and stopped for some reason, you can do that by adding the --all flag to the above command like:
docker ps --all
This will give you the list of all the containers that ran in the past and are currently running in your system.
3. Remove all the stopped containers:
docker system prune
This command basically deletes all the stopped containers, all the networks that are not used at least by one container, all dangling images, and all the build cache.
It will throw the IDs of the deleted containers as the output.
4. Retrieve Log Output from a Container
docker logs <container-id>
This command is super helpful and comes in very handy for us when trying to debug a container that stopped in an unexpected manner or just inspect a container and see what is happening with it.
5. Now that you know how to start a container how do you stop it?
This can be done in two ways:
docker stop <container-id>
docker kill <container-id>
Hmm, both these look the same, isn't it? Now let's discuss what's exactly different between these both.
docker stop <container-id> - This command issues a SIGTERM signal to the primary process that is running inside a container. Read more about this signal here. To summarize and put it short, this basically is an elegant way to shut down a process. this gives time for a process to run clean-up tasks or for example to save a file at the last moment.
docker kill <container-id> - This command issues a SIGKILL signal to the primary process that is running inside the container. Read more about this signal here. This is used to immediately stop the process and shut down the container.
Credit to the instructor of the "Docker and Kubernetes: The Complete Guide" course on Udemy for all the pictures and his amazing explanation.
I hope this blog has given you a good introduction to Docker. I'm still learning and trying to upskill myself in DevOps. So if you find anything wrong with my understanding above, please leave a comment below (Always curious to learn) and if you have any questions or comments, please feel free to leave them below. Thank you for reading. Will see you in the next one. Stay Tuned. Peace..✌️